08 July 2013

Ice Pack Socks

I have a lot of trouble with painful feet. I mean really painful feet. Can't walk far, keep me awake at night painful feet. Probably from a congenital plantar fascia defect. The pain is constant, and deep, through the bones, and maddening!

A TENS machine does help interrupt the pain, but the simplest treatment I've found so far is ice packs. It dulls the pain nicely, and helps me get to sleep. But ice packs are ungainly things, and it's hard to keep them wrapped up (to protect your skin), and also sitting in the right place on your foot!


So I've invented these ice pack socks. Basically, I've added a pocket to the sole of a sock, and a mini ice pack (like the sort used for kiddie lunch boxes) can fit inside it. This holds the ice pack in position, and protects your skin from direct contact with the ice pack.

If you have pain on the top of your feet, just make the flap big enough to fit over the top of your foot, and sew it into the top position.

NB: these are not for walking in! You're likely to pop the ice pack, and get gel everywhere, eeeeeeew.

Here's how to make them:

Ice Pack Socks (knitted)

Choose a favourite simple knitted sock pattern. I made mine with 8 ply yarn, and the Sock of Doom pattern (Ravelry link), but you can choose whatever you like. 4 ply is fine. Remember, it's just for wearing in bed, so just needs to be comfortable, not fancy. A firm fitting sock is best.

Knit the sock (yeah, just like that!) I made mine ankle length, but you can do whatever you like best length-wise.

Once the sock is done, put it on, and see where the edges of the sole are. You're going to pick up stitches along the right side of the foot. For my sock, I picked up 34 sts ... it will depend on what weight yarn you've used. For a 4 ply sock, you will be picking up a lot more stitches than that.

Now, you're going to make a flap, which will become the pocket on the sole. You can just knit a rectangle, or you can do a few increases at the toe end of each row to make a shape that fits along to toe a bit more. It doesn't matter too much, as mini ice packs are generally rectangular.

Once you've got to the right width to fit across the sole, bind off, leaving a nice long tail. Bind off so that the tail will be at the 'heel end' of the flap.

Sew the flap onto the sole of the sock, so the left side, and the end (at the toe). If you have pain in both feet, make a second sock.

Ravelry link.


Here are my exact instructions for my pocket (8 ply sock, on 3.75 mm needles), with toe shaping, in case you want to do it exactly the same:
  • Pick up 34 sts along right side of sole.
  • Knit 1 row
  • All wrong-side rows: K1, P to end of row
  • Increase Row: Kfb (increase by 1), K to end
  • Repeat Increase Row (on RS rows) until have 38 sts in total
  • Knit 10 rows in stocking stitch
  • Decrease Row: K2tog, K to end
  • Repeat Decrease Row (on RS rows) until have 34 sts
  • Bind off on RS row.
  • Leave long tail.
  • Sew flap to sole of foot, along left edge and toe.


Hand-Sewn Version

You'll need a pair of bought socks, and a scrap of knit fabric, from an old t-shirt, for example. You'll also need a needle and thread, some cardboard, scissors and a pen.

Trace around your foot on the cardboard, and cut it out. Place this template inside the sock, against the sole of the sock.

Cut a piece of the scrap fabric that will cover the ice pack when stretched. Cut to fit the shape of the bottom of the sock. The open edge of the pocket should be straight, no need to curve it to fit the heel shape.

Now pin your pocket flap piece around the left, toe, and right edges of the sole. Sew in place. Leave the cardboard inside the sock, as a surface to rest the fabric against (and to stop you from sewing the top of the sock to the bottom). Ta dah! Now do the other one  :)


21 June 2013

A new book


This week I've started work on a new book, on neurosarcoidosis. It will have a few chapters on the current understanding of the disease, how it's diagnosed and treated, and some chapters on proactive strategies for living with it.

The second part of the book will be collected patients' experiences, arranged by topic. So, if you have confirmed neurosarcoidosis, and would like to be involved, please drop me a line! There is a permission form to fill in, and a questionnaire. You can write as little or as much as you like, and you don't have to answer all the questions if you don't want to. You can also appear under a pseudonym, if you wish.

The deadline for submissions is the end of September 2013.

Hope to hear from you!

02 April 2013

How to fix pulled stitches


Over the past few months I've been doing battle with my Adrift top (I hereby vow, in public, that I am never knitting laceweight again!). It is gorgeous, but my god, the stitches pull! Every time my dogs even look at it, I swear, there's another pulled stitch. And my fingernails. Some of them are very obvious, with an unsightly row of pulled stitches across whole swathes of the top.


So I have spent hours and hours and hours trying to tease out these pulled stitches, in lace weight. Which is a fucking pain in the arse. All my forays into looking for advice on 'fixing pulled stitches' just say to 'ease out the pulled threads' and nothing much else. Which really didn't help with the mess I was in. And I suspect that 'fixing pulled stitches' is going to be a constant part of the care for this garment.

But last week, suddenly my technique — which, frankly, hadn't been that successful up til then — suddenly improved. I've got the knack!

So I've made this little tutorial to help you, too, if you're battling with large areas of damage and pulled stitches. I'm using 8 ply in this sample, and the pulled row is in red, but obviously in your own knitting, your pulled thread row will probably be in the same colour as the background (which is what makes the task tricky).

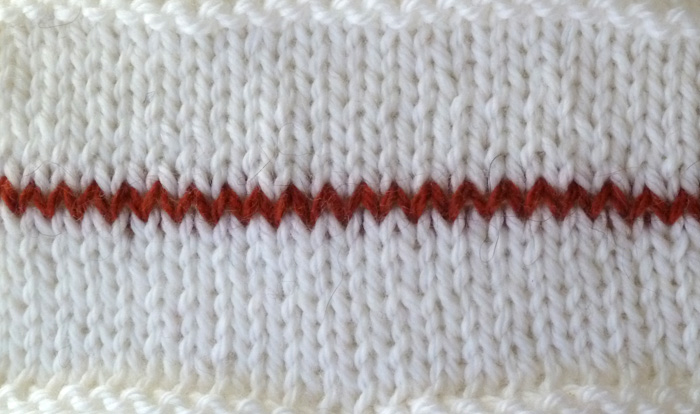
1) Here is your lovely smooth knitting, with a nice red stripe.


2) Oh noes! Some naughty puppy claw has caught on your work, and pulled. 


3) This is what it looks like on the wrong side. Not good. 


4) Pull the 'loose' yarn through to the wrong side of your work, using a blunt pin or darning needle. I find it easier to correct the mistakes when looking at the wrong side of the knitting, but if you prefer to work on the front, then just skip this step. The basic principles are the same.


5) Now, the main trick is this: you need to 'read' your knitting, and trace the path that the single row's yarn takes. The photo below illustrates this path. Use a blunt needle or pin to pull the loose yarn along the path of the knitting, slowly easing out the stitches until all the pulled stitches are back to their proper size, and the loop of pulled yarn is sitting back into the row where it belongs. A bright light helps.


6) So, to follow the direction of the stitches, you'll first pull an upper thread (purl bump), and then a lower thread (another purl bump), then the next upper, then the next lower, and so on along the row.

Your knitting probably will be in the same yarn colour as the rest of the knitting around it, so unlike here where there's a nice red line to trace, you'll have to look really closely and follow the path the yarn for that pulled row takes, looping into the stitches above and below that row.

7) Work outwards from the main loop of loose yarn in the middle of the pulled area, outwards, first one side then the other. Upper loop, lower loop, upper, lower, in order, all the way along. 


Keep on in this manner, closely looking for where the path of the pulled yarn is going, and pulling gradually, from the middle out to the edges of the pulled row, until first one half, and then the second half of the yarn is pulled back into its proper position. Keep checking your progress on the other side of the knitting.

It does take time, and it does take patience, but it can be done. See?

Good luck!


Printfriendly